| 1 | ||
| 2 | ||
| 3 | ||
| 4 | ||
| diagrams | ||
| .gitignore | ||
| LICENSE | ||
| README.md | ||
A Modular Architecture for Elm programs
This tutorial outlines the general architecture you will see in all Elm programs. It is a simple pattern that is great for modularity, code reuse, and testing. I find it somewhat shocking in its simplicity. We will start with the basic pattern in a small example and slowly build on those core principles.
To follow along with this tutorial, clone this repo and navigate to the root directory.
The Basic Pattern
The logic of every Elm program will break up into three cleanly separated parts: model, update, and view. You can pretty reliably start with the following skeleton and then iteratively fill in details for your particular case.
-- MODEL

type alias Model = { ... }


-- UPDATE

type Action = Reset | ...

update : Action -> Model -> Model
update action model =
  case action of
    Reset -> ...
    ...


-- VIEW

view : Model -> Html
view =
  ...
This tutorial is all about this pattern and small variations and extensions.
Example 1: A Counter
Our first example is a simple counter that can be incremented or decremented.
To see it in action, navigate into directory 1/, run elm-reactor, and then
open http://localhost:8000/Counter.elm.
This code starts with a very simple model. We just need to keep track of a single number:
type alias Model = Int
When it comes to updating our model, things are relatively simple again. We
define a set of actions that can be performed, and an update function to
actually perform those actions:
type Action = Increment | Decrement

update : Action -> Model -> Model
update action model =
  case action of
    Increment -> model + 1
    Decrement -> model - 1
Notice that our Action union type does not do anything. It simply
describes the actions that are possible. If someone decides our counter should
be doubled when a certain button is pressed, that will be a new case in
Action. This means our code ends up very clear about how our model can be
transformed. Anyone reading this code will immediately know what is allowed
and what is not. Furthermore, they will know exactly how to add new features
in a consistent way.
Finally, we create a way to view our Model. We are using elm-html to
create some HTML to show in a browser. We will create a div that contains: a
decrement button, a div showing the current count, and an increment button.
view : Model -> Html
view model =
  div []
    [ button [ onClick (Signal.send actionChannel Decrement) ] [ text "-" ]
    , div [ countStyle ] [ text (toString model) ]
    , button [ onClick (Signal.send actionChannel Increment) ] [ text "+" ]
    ]

countStyle : Attribute
countStyle =
  ...
The first thing I want you to notice about this code is that it is entirely
declarative. Take in a Model and produce some Html. That is it. At no point
do we mutate the DOM, giving the language and libraries much more freedom to
make clever optimizations. Furthermore, view is a plain old
function so we can get the full power of Elm’s module system, test
frameworks, and libraries when creating views.
This pattern is the essense of architecting Elm programs. Every example we see
from now on will be a slight variation on this basic pattern: Model, update,
view.
Aside: Driving your App with Signals
So far we have only been talking about pure functions and immutable data. This
is great, but we also need to react to events in the world. This is the role of
signals in Elm. A signal is a value that changes over time, and it lets us
talk about how our Model is going to evolve.
Pretty much all Elm programs will have a small bit of code that drives the whole application. The details are not super important for our purpose, but the code will be some minor variation of what is seen in Example 1:
main : Signal Html
main =
  Signal.map view model

model : Signal Model
model =
  Signal.foldp update 0 (Signal.subscribe actionChannel)

actionChannel : Signal.Channel Action
actionChannel =
  Signal.channel Increment
Rather than trying to figure out exactly what is going on line by line, I think it is enough to visualize what is happening at a high level.
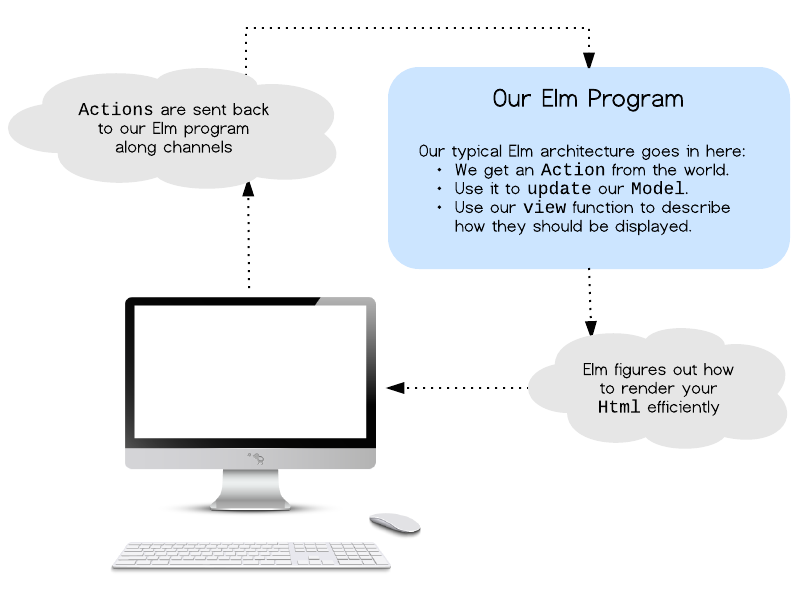
The blue part is our core Elm program which is exactly the model/update/view pattern we have been discussing so far. When programming in Elm, you can mostly think inside this box and make great progress.
The new thing here is how “channels” make it possible for new
Actions to be triggered in response to user inputs. These channels are
roughly represented by the dotted arrows going from the monitor back to our
Elm program. So when we specify certain channels in our view, we are
describing how user Actions should come back into our program. Notice we
are not performing those actions, we are simply reporting them back to
our main Elm program. This separation is a key detail!
I want to reemphasize that this Signal code is pretty much the same in all
Elm programs. You can be very productive without diving much deeper than this,
and it is not vital to modularity or the specific architecture this tutorial
is focused on. All of our subsequent examples will focus on the Model,
update, and view so that we do not repeat this signal information again
and again.
Example 2: A Pair of Counters
In this example we have two counters, each changing independently. To see it
in action, navigate into directory 2/, run elm-reactor, and then
open http://localhost:8000/CounterPair.elm.
We wrote a simple counter in example 1, so our goal is to reuse all of that
code. We can create a self-contained Counter module that encapsulates all the
implementation details. The only change necessary is in the view function, so
I have elided all the other definitions which are unchanged:
module Counter (Model, init, Action, update, view) where

type Model = ...

init : Int -> Model
init = ...

type Action = ...

update : Action -> Model -> Model
update = ...

view : LocalChannel Action -> Model -> Html
view channel model =
  div []
    [ button [ onClick (send channel Decrement) ] [ text "-" ]
    , div [ countStyle ] [ text (toString model) ]
    , button [ onClick (send channel Increment) ] [ text "+" ]
    ]
Rather than refering directly to a top-level actionChannel as we did in
example 1, we give the channel as an argument so that each counter can be
sending messages along different channels. This will let us augment a basic
Counter.Action with extra information so that we know which counter is needs
to be updated.
Creating modular code is all about creating strong abstractions. We want
boundaries which appropriately expose functionality and hide implementation.
From outside of the Counter module, we just see a basic set of values:
Model, init, Action, update, and view. We do not care at all how
these things are implemented. In fact, it is impossible to know how these
things are implemented. This means no one can rely on implementation details
that were not made public.
So now that we have our basic Counter module, we need to use it to create
our CounterPair. As always, we start with a Model:
type alias Model =
    { topCounter : Counter.Model
    , bottomCounter : Counter.Model
    }

init : Int -> Int -> Model
init top bottom =
    { topCounter = Counter.init top
    , bottomCounter = Counter.init bottom
    }
Our Model is a record with two fields, one for each of the counters we would
like to show on screen. This fully describes all of the application state. We
also have an init function to create a new Model whenever we want.
Next we describe the set of Actions we would like to support. This time our
features should be: reset all counters, update the top counter, or update the
bottom counter.
type Action
    = Reset
    | Top Counter.Action
    | Bottom Counter.Action
Notice that our union type refers to the Counter.Action type, but we do
not know the particulars of those actions. When we create our update
function, we are mainly routing these Counter.Actions to the right place:
update : Action -> Model -> Model
update action model =
  case action of
    Reset -> init 0 0

    Top act ->
      { model |
          topCounter <- Counter.update act model.topCounter
      }

    Bottom act ->
      { model |
          bottomCounter <- Counter.update act model.bottomCounter
      }
So now the final thing to do is create a view function that shows both of
our counters on screen along with a reset button.
view : Model -> Html
view model =
  div []
    [ Counter.view (LC.create Top actionChannel) model.topCounter
    , Counter.view (LC.create Bottom actionChannel) model.bottomCounter
    , button [ onClick (Signal.send actionChannel Reset) ] [ text "RESET" ]
    ]
Notice that we are able to reuse the Counter.view function for both of our
counters. For each counter we create a local-channel. Essentially what we
are doing here is saying, “let these counters send messages to the
general actionChannel but make sure all of their messages are annotated with
Top or Bottom so we can tell the difference.”
That is the whole thing. With the help of local-channel, we were able to
nest our pattern model/update/view pattern. The cool thing is that we can keep
nesting more and more. We can take the CounterPair module, expose the key
values and functions, and create a CounterPairPair or whatever it is we need.
Example 3: A Dynamic List of Counters
A pair of counters is cool, but what about a list of counters where we can add and remove counters as we see fit?!
Example 4: A Fancier List of Counters
Additional Comments
Given how many conflicting definitions of MVC are floating about in the world, I am not sure how valuable it is to try to see connections besides making the simple observation that these things look related.
The architecture I outlined here is made up entirely of immutable data and functions with no side-effects, making it uniquely easy to reuse and test code. I think it is much more important to focus on the specific patterns and techniques than to get obsessed with relating it to other stuff, especially if that other stuff has a contested defintion and worse properties when it comes to testing, reuse, and modularity.